
DIY Bike Maintenance for Hydraulic Disc Brakes at Home: A Real-World Guide

Read Time:6 Minute, 30 Second
Let’s be honest — hydraulic disc brakes are a bit intimidating at first. All that fluid, the bleeding process, the weird mineral oil smell. But here’s the thing: with a little patience and the right know-how, you can handle most of the maintenance yourself. No need to drop $80 at the shop every time your brakes feel spongy. I’ve been there, done that, and honestly, it’s way more satisfying than you’d think.
So, grab a beer or coffee, clear off the kitchen table (or garage bench), and let’s walk through this together. We’ll cover the basics — from pad swaps to bleeding — without the fluff.
Why Bother Doing It Yourself?
Well, first off, you save money. A basic bleed kit costs about what you’d pay for a single shop visit. Second, you learn your bike’s quirks. Every brake system has a personality — some are finicky, some are forgiving. Knowing how yours behaves means you can fix a trail-side issue in minutes instead of walking home.
Plus, there’s a weird pride in hearing that crisp, metallic bite after you’ve done the work yourself. It’s like tuning your own guitar — sure, you can pay someone, but it never sounds quite the same.
What You’ll Need: The Toolkit
You don’t need a full mechanic’s setup. Here’s the shortlist:
- Bleed kit — specific to your brake brand (Shimano, SRAM, Magura, etc.). Don’t mix fluids — mineral oil vs. DOT fluid is a real thing.
- Torx or Allen wrenches — usually T25 or 4mm/5mm for calipers and levers.
- Isopropyl alcohol (90% or higher) — for cleaning rotors and pads.
- Clean rags — lint-free if possible.
- Rubber gloves — DOT fluid eats paint and skin. Mineral oil is less nasty, but still messy.
- A bleed block or pad spacer — keeps pistons from popping out.
- Syringe and tubing — usually comes with the bleed kit.
Pro tip: lay down newspaper or a cardboard box. You will drip something somewhere.
Step 1: Pad Inspection and Replacement
This is the easiest place to start. If your brakes are squealing or you’re losing stopping power, check the pads first. Look through the caliper — if the friction material is less than 1mm thick, it’s time.
How to swap pads without losing your mind
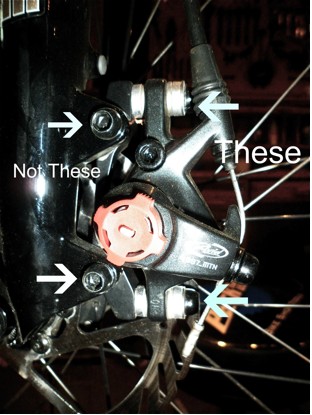
Remove the wheel. Then, using a Torx or Allen key, pull the retaining pin or clip that holds the pads in. Sometimes they’re held by a cotter pin — just wiggle it out. Carefully slide the old pads out. Don’t squeeze the brake lever while the pads are out — you’ll pop the pistons, and that’s a whole other headache.
Before inserting new pads, push the pistons back into the caliper using a plastic tire lever or a dedicated tool. A flathead screwdriver works, but it can damage the pistons. Go slow. If they resist, open the bleed port slightly to relieve pressure.
Clean the caliper area with isopropyl alcohol. Insert the new pads, secure the pin, and you’re good. Bed them in with 10–15 gentle stops from moderate speed before hitting the trails hard.
Step 2: Rotor Care — The Unsung Hero
Rotors warp, get contaminated, and sometimes just look sad. A quick check: spin the wheel and listen for a rubbing sound. If you see a wobble, you might need to true the rotor with a rotor truing fork (or an adjustable wrench, carefully).
For cleaning, use isopropyl alcohol and a clean rag. Never use WD-40 or degreasers — they leave residue that kills braking performance. If your rotors are glazed or have deep grooves, it’s time to replace them. Measure thickness with a caliper — most rotors have a minimum thickness stamped on them.
Step 3: Bleeding Hydraulic Brakes — The Main Event
This is where people get nervous. But honestly, it’s like changing the oil in your car — messy but straightforward. You’ll know you need a bleed when the lever pulls all the way to the bar, feels spongy, or you’ve recently opened the system.
Shimano vs. SRAM: A Quick Note
Shimano uses mineral oil. SRAM (and most American brands) use DOT fluid — usually DOT 4 or 5.1. Never mix them. Check your lever or caliper for a label. If in doubt, look up the model online.
The Bleeding Process (Simplified)
Here’s the deal: you’re pushing old, contaminated fluid out and fresh fluid in. Most kits work from the caliper up to the lever.
- Remove the wheel and pads. Install the bleed block into the caliper. This keeps the pistons from moving.
- Attach the syringe to the caliper bleed port. Fill it with fresh fluid. Open the port slowly.
- Attach the other syringe (or a catch bottle) to the lever bleed port. Open that port too.
- Push fluid from the caliper upward. You’ll see bubbles and old fluid come out at the lever. Go slow — no need to rush.
- Tap the brake lines gently with a wrench to dislodge stubborn bubbles. You’ll hear them pop.
- Close the lever port first, then the caliper port. Remove the syringes. Clean up any drips immediately.
- Reinstall the pads and wheel. Pump the lever 20–30 times to build pressure. It should feel firm — like squeezing a ripe avocado.
If the lever still feels soft, you might have air trapped. Try the process again, or tap the lines more aggressively. Sometimes a second bleed is needed — don’t sweat it.
Common Pitfalls (And How to Avoid Them)
I’ve made every mistake in the book. Here’s what to watch for:
- Over-tightening bleed ports — they’re tiny and strip easily. Snug is enough.
- Spilling DOT fluid on paint — it’s like acid. Wipe immediately with water.
- Forgetting to push pistons back — then you can’t fit new pads. Oops.
- Using the wrong fluid — seriously, check twice. Mineral oil in a DOT system ruins seals.
- Skipping the bed-in process — new pads need heat cycles to work properly. Don’t just ride off and expect perfection.
When to Call It Quits and See a Pro
Look, I’m all for DIY, but some things are worth leaving to the experts. If you’ve bled the brakes three times and they’re still spongy, you might have a leaky seal or a damaged hose. If the lever feels gritty or sticks, the master cylinder could be toast. And if you’re dealing with electronic shifting or integrated brake/shift levers, sometimes the complexity isn’t worth the headache.
Also — if you’re not comfortable, that’s okay. No shame in paying a mechanic for peace of mind. But at least now you know what they’re doing, right?
A Quick Reference Table: Fluid Types by Brand
| Brand | Fluid Type | Common Models |
|---|---|---|
| Shimano | Mineral Oil | XT, SLX, Deore, Ultegra |
| SRAM | DOT 4 or 5.1 | Guide, Code, Level, G2 |
| Magura | Mineral Oil (Royal Blood) | MT series, Trail brakes |
| Hope | DOT 5.1 | Tech 3, Tech 4 |
| Tektro | Mineral Oil | Orion, Auriga, HD series |
Keep this in mind when buying a bleed kit. Some brands sell universal kits, but dedicated ones are easier.
Final Thoughts — You’ve Got This
Maintaining hydraulic disc brakes at home isn’t rocket science. It’s messy, sure. It takes a few tries to get the technique down. But once you hear that solid bite and feel the lever stop where it should — man, that’s a good feeling. You’ll save cash, build confidence, and maybe even impress your riding buddies.
Start small. Swap the pads first. Then graduate to a bleed. Before you know it, you’ll be the person your friends call when their brakes feel weird. And honestly? That’s a pretty cool place to be.
So go ahead — get your hands dirty. Your bike will thank you. And your wallet will too.


Happy
0 %

Sad
0 %

Excited
0 %

Sleepy
0 %

Angry
0 %

Surprise
0 %
 0
0
 0
0
More Stories
Cargo Bike Lifestyle for Families and Deliveries: The Two-Wheeled Revolution Nobody Saw Coming
Remember when a bike was just... a bike? You know, something with two wheels, a chain that occasionally slipped, and...
Bike Commuting Safety Tech and Smart Gear: The Modern Rider’s Arsenal
Remember when commuting by bike meant little more than a helmet, a flickering red light, and a silent prayer at...
Cargo Bike Conversion for Family Transportation: The Ultimate (and Honest) Guide
So, you’re thinking about swapping the minivan for something with two wheels and a whole lot more soul. Honestly, I...
Cargo Bike Family Safety Tips: Ride Confident, Ride Together
Look, I get it. You’ve just dropped a small fortune on a cargo bike — that beautiful, boxy beast that...
Sustainable Practices in Bicycle Maintenance and Repair: A Greener Spin on Keeping Your Bike Rolling
Let’s be honest. When we think about the eco-friendly nature of cycling, we picture clean air, quiet streets, and a...
Adaptive Cycling: Unlocking Freedom on Two (or Three, or Four) Wheels
There’s a feeling you get on a bike. The wind in your face, the rhythm of your legs, that sense...
Average Rating